
Craft Room Tour & The Original Scrapbox Workbox
Recently, I was featured for my craft room tour on The Original Scrapbox company blog for a Meet the Maker series. And after working with them on the feature, I decided it was time to share my craft room on the blog. It is long overdue.
And I am so excited to finally share and give you a craft room tour to see where I make all the things for both my blog and shop.
This post contains affiliate links for your convenience. There’s no additional cost to your, but in case you want to know where everything is from, I’ve added links for your reference. You can see my full disclosure here!
Crafty Life Mom Craft Room Tour including How I use my Original Scrapbox Workbox and Studio Tower from the Original Scarpbox Company. Get organization and tips for all of your craft room supplies.
I didn’t always have this craft room. In fact, my first home was actually a 2 bedroom condo. Of course, my first ever craft room was the tiny spare bedroom in that condo. It was pretty small and dark!

My Old Craft Room Space
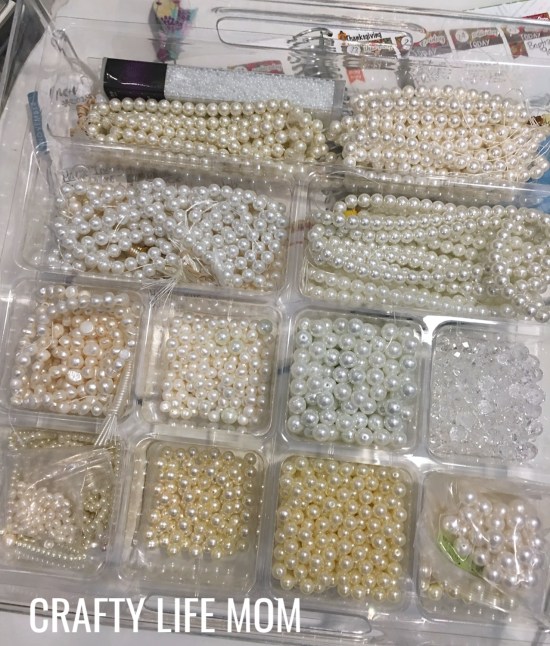
You can see it was a pretty small room and was kind of dark. My first serious crafting days comprised of making jewelry. I first started with beaded jewelry and then moved on to personalized metal stamped jewelry pendants.
Which then led to offering personalized products that you can still find in my shop today.
I still make some jewelry for others. But not as much as I used to. I did lots of creating for Zulily and Plum District. I sold thousands of pieces at a time. And I had a ton of jewelry making inventory.
I stored all of my beads in boxes that just sat on the top of my work tables. I had to be very careful not to bump the table or they would slide and possibly bump and fall sprinkling beads everywhere.
Once we moved into our new home, I had a new larger bedroom to dedicate as my craft room.
Then we had our first son, and 22 months later our boy/girl twins arrived. When my twins turned about 18 months old I felt it was time to give our daughter her own room and space.
This meant I had to give up my craft room.
It took me 18 months to finally decide to do it. But, you can believe that I thought about it much longer than that. From the first moment I heard I was having twins, I knew my craft room wouldn’t last forever.
The Original Scrapbox Workbox
Just before moving my daughter into my craft room, I discovered the Original Scrapbox company and the Workbox. It was like an answer to my crafting prayers. I decided to purchase one to hold all of my crafting supplies.
What is the Scrapbox Workbox?

The Scrapbox is a large crafted box of furniture that basically holds an entire room’s worth of crafting supplies inside of it. When it is open all the way it stretches about 9 feet wide. And when it is closed up it is a beautiful armoire piece of furniture.

Originally, I put the Workbox in my front formal living room. And it worked great. However, we had our main family desk in another location in our home and after a little more figuring, and another year later I decided to take over our dining room.
We are not formal people by any means. We only used the dining room for Christmas. The other 364 days of the year it just sat looking pretty. So, I decided to make good use of the room.
I kept the dining table, removing the leaf of the table and refinished it into a pretty white and gray wash. I also removed all of the dining chairs and added a farmhouse bench and one rolling office chair.
Sometimes, I will let my kiddos sit here with me while I craft and they do their homework. But for most of the time it is Mommy’s “Craft Office”.

I absolutely love the space now and it is such a dream to work in.
Working in the Scrapbox Workbox
Since my kiddos are in school, most of the day my time is spent working on customer orders from my shop or from local customer orders. I also work with a few boutiques in town and provide embroidery and monogramming services as a third party to their customers. So there is always something to create every single day.
When I am not working on orders, I am working on this blog sharing craft projects, DIYs, and tutorials. Teaching others to craft is my absolute favorite thing to do.
For the most part of the day, my Workbox is open. And ready for me to get to what supplies I need to create for whatever project I am working on. At night, I strive to close it up. But often times, I end my day mid-project and leave it open ready for the next day.
Usually, come Friday, I do close it up as if I am closing up my shop for the weekend. I spend most of my weekends with my family and doing family related activities.

Inside My Scrapbox Workbox
Inside the Workbox there are of over 79 plastic acrylic storage bins! It is amazing that many bins fit in the cabinet. I keep everything in here from ribbons to floral supplies, buttons, canvas fabrics, scrapbook papers, cardmaking supplies, vinyl, jewelry making supplies, paint, scissors, pens, tools and so much more.
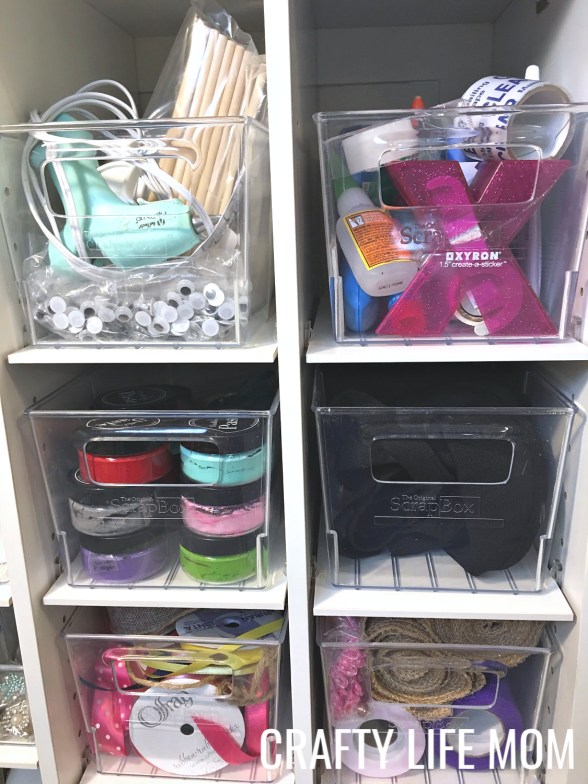
The clear totes make it so you can see everything very quickly. Some other Workbox owners have decorated the bins. But I have chosen to keep them clear so that I can visually see what I have where.

If you are any kind of crafter, you can accumulate craft supplies quickly. And the Workbox helps you organize them so much better than any other craft storage system out there.
Remember, I fit a whole room in my workbox when I first lost my craft room to my daughter.

The clear acrylic totes come in a variety of sizes. Some are a 12X12 size which is perfect for storing scrapbook paper and cardmaking supplies. While some bins are shoebox size.

It also comes with a few storage tray inserts for the 12X12 bins. These are perfect for storing any notions you may have or smaller pieces or die-cuts. You can purchase additional extra ones if need be.
To left side of my workbox, I store all of my adhesive vinyl. I use about 8 12X12 bins to store my vinyl by type and color. I also have a bin for scrap vinyl pieces left over from other projects. Vinyl rolls also fit in the bins nicely.

I also use them for storing some of my beads as well. Perfect for sorting out like items or colors.
Storing Pens And Tools
In the center of the Workbox, there is a space that you can outfit and customize to your liking. I opted to purchase the Scrapmabox which is perfect for holding all of your different pens, pencils, and markers. This also forced me to have them all in one place where I can see them. I was able to go through my collection and clear out anything that dried up or that I had duplicates of.
Now I have them all in one place, not hiding in bins or drawers and grab what I need when I need it.
I can see all of my vinyl Silhouette and Cricut tools in one place too which is perfect when I am weeding a vinyl project. I can just easily grab the tool I need.

There is also a small space to the left of the Scrapmabox to put all of my cutting mats. I can easily reach the mat I need. They fit nicely in this little nook. And it is super handy.
Just below this is where I keep my Silhouette Cameo 3 machine, and I am able to work right on the attached work table. I love the work table because it is an additional space for a project or even just blogging.
I love sitting in the nook with all of my craft supplies hugging around me for inspiration!

I recently decided to update my work table surface by applying shiplap peel and stick wallpaper to the surface.

I love the look of it, and it also protects my work table. Plus, it doubles a great background for taking overhead photos of craft projects for the blog and for making craft project videos.

The Studio Tower
I recently added the Studio Tower to my room. It provides just a little bit more storage and function.
Since I do a lot of embroidery projects and monogramming work I love the idea of a rotating storage tower. I keep all of my embroidery threads and fabrics on the tower. So, when I am doing an embroidery project, I can reach quickly whatever fabric I need to put into my appliques.
Plus, I really love how the Studio Tower helps me keep my threads so much more organized. And I have so much more room now for additional spools of thread.
It is a true crafters dream to have extra space available for more supplies!

Before, my threads sat in a rotating dark metal tower that sat on a small sewing desk I never used. The threads would kind of get tangled and if you bumped the metal tower they would go flying everywhere. It was such a flimsy thing for being made from metal.
With the Studio Tower, I do not have that problem at all. It is sturdy, holds a lot of thread and is beautiful to look at.
My Craft Room Tour
So what do you think? Do you love the Scrapbox Workbox and Studio Tower now just as much as I do?
I created a video of myself walking in my craft room showing off the bins and organization. Take a look.
The company recently just released the Dream Box which is similar to the Workbox with a little bit more space and upgraded. The Dream Box comes in additional colors and in a beautiful shaker style cabinet facing.
It really is a beautiful piece of furniture as well!
Want to Join The Crafty Life Mom Community?
I provide craft projects and DIY tips and tricks for all of your crafting needs each week through the Crafty Life Email Club. Subscribers get access to my entire private craft resource library. I share printables for crafting projects and home decor DIYs. Plus I have several SVG cut files that you can use with your Cricut or Silhouette cutting machine and checklists and more!
Click the Pink Box below to get FREE Access!

Leave a comment and let me know what you think? I’d love to see your craft room too!

Related Post: The Best Crafts to Make From Dollar Store Items
Don’t forget to check out My Meet The Maker Article on The Original Scrapbox Workbox blog where you can also check out other Meet the Makers!

[…] supplies within the craft storage cabinet at an arms reach. You can also check out my Craft Room Tour in this video to see how I have it set up!*Hint I took over the dining […]