Home Decor Hack: DIY Ottoman Makeover

I love a good home decor hack. This DIY home decor hack shows you how to easily recover an old ottoman in your home and update your home decor in your living room or family space.
Have you every had that piece of fruniture that you love, but have had for so long now that it is in desperate need of a makeover? Well, when my husband and I were newly married, we purchased this very large, faux leather ottoman and we loved it!

We thought it was trendy and stylish at the time, but over the years, it became worn in, maybe a little too worn in and became scuffed and not so attractive anymore.
We never got rid of it and even now, several years later my kids have all kick it around, tumbled over it, and it clearly shows some solid wear and tear, we don’t want to part with it, but I knew I wanted to revamp it, give it a good makeover, and bring it back to life!
Of course, I could’ve just tossed it, sold it at a garage sale, or even put it up on one of those Facebook websites for someone to come along and buy it, but I still love the bulky-shaped thing, its odd rectangle wide shape and all. It acts as extra seating and a tv tray, a place to put our feet up on, and well sit on. So, being the crafty girl I am, I knew I could get some fabric that I would be in love with, yet durable enough to stand up to my kids’ ruggedness and spruce it up.
And that’s exactly what I did and I’ve even given you the details on how I recovered my ottoman below!
First, I purchased some gray and white striped duckcloth fabric from Fabric Guru which happened to be on sale. I chose duck cloth as the fabric type because it’s a little more heavy-duty and a thicker fabric than your usual cotton, and is in fact, more for upholstery or even outdoor-type furnishing projects. You can also check in other fabrics like an ultra suede fabric which would be great for a project like this.
Now, I probably could have accomplished this makeover with around 2 yards, but ended up purchasing more than I needed, however, I love it enough that I’m sure I will use the remaining fabric on other projects for my home the future.
Once my fabric arrived, which came pretty fast – within the week, I decided to use a Sunday afternoon to recover the ottoman.
No, it was not during nap time! That’s right, I just did it right there in the living room, while kiddos were watching and playing TV.

I did have to keep them away from “mommy’s project” in the beginning but for the most part they steered clear. I even got my 4 year old to help me remove and throw away the old staples as I pulled them out of the old fabric. He’s such a good helper!
Getting Started
I started with it upside down and remove the feet before I began plucking out all of the staples from the old fabric (I just used a simple pair of pliers for this part). It took about 30 minutes to get them all out and once that was done, I could remove the old faux leather fabric.

Once removed, I noticed there was an additional liner that hide the underneath portions of the ottoman. I was careful to keep this fabric liner, so that I could reuse on the bottom once complete.
Covering The Ottoman with New Fabric
Next, I draped my fabric over the box and eyeballed to ensure I had enough to tuck and re-staple back down. Since my fabric was not quite wide enough to drape over the sides and ends I had to make do, and attach another piece of fabric and sew it on the side.

Now, my sewing skills are not the greatest so I just ran it through my machine once, sewing one single line down the length of the entire piece of fabric.
If you do this project, and you have a basic sewing machine, you can do it that way as well. My sewing stitch line was pretty straight for the most part, and thankfully I’m not too picky about it. I am happy with how it turned out since I’m not quite the expert sewer.

Once thew sewing was done, I fipped the ottoman box on top of the fabric – wrong side up.
The fun part for me was stapling the new fabric!
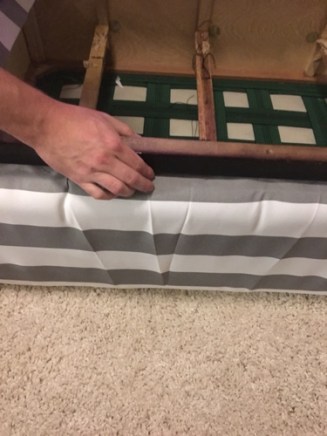
I really had no plan on how to do this, except I made sure that whatever I did to the first side, I mirrored on the opposite side, to make sure it was semi-balanced looking.

For the corners, I just kind of tucked and folded the fabric in such a way to make this pleat. I didn’t worry too much about it being perfect, but I did kind of play with the fabric before finally stapling that section down.

If you don’t have a staple gun lying around, I suggest using this one. It is fairly inexpensive and has a nice grip if you have smaller hands. This helps make the job easier.
The buttons were next and while I thought this part would be simple, I was wrong! Over the years as buttons had fallen off, I kept them thinking I might need them to ever replace the fabric.
However, a word to the wise, if you decide to do this kind of project, just purchase new buttons. At first, I was hot-gluing fabric over the old buttons, and that just ended up looking ridiculous.
So instead, I went the next day to Joann’s fabric and puchased these buttons. It even came with a nifty little tool to help properly cover the buttons in fabric with out any glue.

These kits are great and come in several sizes. On the large ones, you may need an little extra might in sinking down the backs, I had my husband help with this.

You can see here the fabric I cut for the button using the guide. You can get these nifty button kits here.
And here you can see the finished button.

Lastly, I threaded the buttons into place on the ottoman, and re-added back that fabric covered I saved previously (It is stapled on the bottom). I screwed back on the legs and moved the piece back into place in my living room!

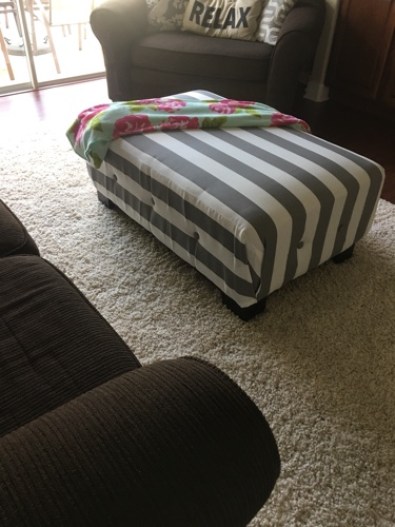
Here it is! I just love it now, and it gives my living room a little fresh update.

My mom came over a few days later after finishing the project, and she thought I bought a brand-new piece of furniture. So, all in all, I would say it was a success!

Have you ever recovered anything in your home? If so leave me a comment. I really like the Renew and Redo movement. It’s much more cost-effective, especially if you already love the piece and its shape.

Comments & Reviews
I love ottomans too. They can pull a room together.