Makeover Your Closet
Awhile back, just a few months after my twins were born, I decided that I needed a girly feminine space to get ready in, aka my closet needed a makeover. I was already dealing with my clothes not fitting, half the items in my closet didn’t fit, were old from my pre-preggo days, and honestly I couldn’t find anything in it.

The makeover idea sort of began when I purchased some really nice velvet coated hangers from HSN. I think I felt if my clothes were hanging properly and neat I’d feel much better about the space and getting ready. So I got to work on brainstorming my closet makeover.
This is what I started with… pretty much an unorganized disaster.

Even the floor where I kept my shoes was very unorganized. I hated having the mix match of hangers and clunky bins.

To get started I knew I needed to do an inventory of everything and decide what I needed and wanted to keep.
Of course, I took everything out of it. I went through every article of clothing and if it didn’t fit then or if I couldn’t remember the last time I wore the item, I put in a donate or giveaway pile. I probably got rid of 100 pieces of clothing all together. I even let friends take things they liked off the spare rack I had out in my front living room. It took me a a few days to go through everything, but once I did, I was so relieved and felt better already.


Once everything was out of the closet (and all over my bed and front room) the space looked rather large and fairly decent size. I was shocked at the amount of space this closet had all over again. I knew I wanted to take advantage of the space, and add more racks and shelving.

Next up, I removed all the old racks. They were placed in the middle of the wall, and for the new plan, I wanted to have double rows, so I could get more clothes” in my closet organize my clothes and space them out properly without being jammed in there. Plus I had to deal with that crazy nook.
At first I thought I could put a dresser in back, back in there, but then if I did a double rack on the right side, the clothes would stop up on top of the dresser space. While I liked the idea of a dresser, I wanted to take advantage of the top of the dresser as well to sort of make a jewelry bar station with a mirror. SO having clothes in front of it would not work.
After measuring and looking all over pinterest, organization stores and ikea I finally decided to get a couple of Ikea billy bookshelves to add to the nook and left side of the closet.

Shelves were perfect for to place folded jeans, shoes, and handbags. Next, hubby added some heavy duty bars for hanging my clothes on. Two levels. We measured this specifically to the longest shirt that I owned and planned to hang on the bottom, then once that was measured, we placed the top rack just above it. It worked out great, because I am not the tallest girl, and just to where about I can reach the highest was also where the top rack would be. He then placed some MDF cabinet shelving above the top rack. I love this because at this point my closet was starting to feel more boutique store closet like!!! Every girls’ dream!
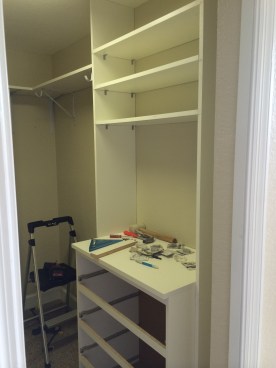
Once that was complete we moved over to the right side of closet. For this side I still liked the idea of a dresser. For two reasons, I could move some things from our main dresser in our bedroom in here freeing up some space for my husband to have more room in the dresser, and two, so I could create the jewelry station. For this we purchased an ikea dresser. I am not sure if they sell the exact one anymore, but I linked one similar.

We then added more cabinet shelving to the sides of the dresser. Once that was complete I put some PVC overlays on the fronts of the dresser. I wanted to glam it up a bit and keep it from looking like every other dresser. PVC overlays is a great way to do that to any piece of furniture. I just spray painted mine silver and then glued them on. I also added knobs since the dresser didn’t come with any and found these fancy swancy ones on sale!

Once that was complete, we added a mirror we found at a yard sale to the back wall above the dresser and I used some of my jewelry making displays from my online shop to put some of my own personal jewelry on.

Once that was complete… the fun part was next, putting all my clothes back in! I organized them by season and colors. All the short sleeve tops when to my left side by color. On the right I put my pants on the bottom, and long sleeve tops on top. In the far back, I put my dresses and coats.

I also placed all of my purses on the top shelf. The left side billy bookcase got bins for different items. One was flip flops, another for bathing suits, and another for clutches and wallets.

Above the jewelry station, hubby placed some more cabinet shelving for me to put my more “fancier” shoes like heels and strappy sandals. I don’t wear them that often, because I am more a flats kind of girl now, but the few I do have and own are on display. Up top are all my boots. That shelf is hard to reach, so if it’s super cold in Florida (which is randomly a whopping 10 days out the year) then I get a step stool and get up there to get them.
All in all, I am very happy with the transformation. I have been using my closet this way for quite some time now, and just absolutely love it. It has been filled a little more with some new shirts and pants. But I am better about also getting rid of things I don’t really wear as I realize it.

I hope you enjoyed my closet makeover. Do you organized your closet by color? Leave a comment below with your organizational tips.

Comments & Reviews
I love this! I don’t have a closet in our current rental so have to make do with a wardrobe and chest of drawers (dresser), it’s all very unorganised at the moment. But this has given me inspiration!
Kim, Im glad I could give you some inspiration!! Let me know what you come up with!