Using the Silhouette Pixscan Mat

Learn how to use the Silhouette Pixscan mat with this tutorial. It is simple and easy to use and the possibilities are endless as to what kinds of creations you can make using the Pixscan Mat. Use any graphic, any image or even your and load it to your Silhouette Studio software.
It’s been just over a year since the Pixscan Mat was introduced to crafters and Silhouette users. And to be honest, I have only known about for about six months.
But ever since I found out about it, I’ve been dying to get one and try it!
This post contains some affiliate links for your convenience (which means if you make a purchase after clicking a link I will earn a small commission but it is at no additional cost to you)! Read my full disclosure here.
So last week when the hubby said he was going to be near our closest Michael’s Craft Store, I instantly handed over a teeny tiny “honey-do” list which was to get me this Pixscan Mat – nothing else!

Well, today is the day, I finally got to play with it!!! And I can’t even begin to tell you or express to you how much I love it!! I cannot believe I’ve waited this long… after my first time of using it, a million other ideas projects, and everything in between popped into my head.
It is quite simple to use, and frankly, makes cutting out a printed project or print and cut image seem even easier to cut out. If you haven’t heard of the Pixscan Mat and what it can do, to put it simply, it is basically a cutting mat with pre-set registration marks on it. The mat is quite nice, a little bit thicker than the regular cutting mat, which I kind of like. Using this mat allow you to cut out a pre-printed design that you may or may not have digitally.
Getting Started with the Pixscan Mat
To begin, you will first need to have either the Silhouette Cameo or Portrait cutting machine. I have both, but for this project, I got the Pixscan mat for the Cameo.
For this project, I had some old scrapbook paper that had some cute flowers on it, that I thought would be nice if cut out to either bible journal with or make a cute card with. I just kept imaging the words, “Bloom where you are planted” when I looked at them and knew I needed them cut.

I cut the scrapbook paper down into a square about 6 inches by 6 inches. This doesn’t really matter that I cut it down, but I wanted to show that it doesn’t really matter where the object is on the mat because the Pixscan mat and Silhouette technology will find your image and cut it precisely.

Take A Picture
Next, using my iPhone I took a picture of my mat, being sure to make sure the entire mat was in the picture frame. You want to make sure you can see the mat and the registration marks in your photo. This picture was taken from above; I didn’t really put to much thought into. The directions for the mat also indicate that the picture taken can even be slightly angled. Either way works, it really is that easy.
Then from my phone, I emailed the picture to myself, opened on my laptop, and downloaded to my desktop for easy reference.

Putting Your Image in the Silhouette Software
Then in my Silhouette software, I clicked the Pixscan button at the top left of the toolbar, and I clicked import Pixscan image from file. It also gives you the option to scan an image using a scanner, but really the iPhone picture was just as easy. Once I uploaded or imported the image, the program automatically placed the image into the design area of the Silhouette program.

Yo can see it shows you a simple picture of the mat, so you know that you are in the right feature.
Here you can see where it says its loading my image. My image is a picture of my scrapbook paper on the Pixscan Mat.

It will look like this in the design software once it is loaded properly.

From there, I used the trace function within the program, just as you normally would when tracing anything within the program. In order to cut the image, you must first trace it using the trace feature within the Silhouette program.

Select the item you want traced, click the trace icon, then click “Select Trace Area” button, then drag your cursor to select the area or image you want traced. In my case it was each flower. I only wanted the two smaller flowers, so I did the first and last flower shown individually. Once you have the box highlighted with yellow, select the “Trace Outer Edge” button. Then you will see red lines, or tracing appear. This is the cut lines.

For this project, I wanted the background of the scrapbook paper, so I chose to to create an offset of the traced image. Once I had the offset, I erased or removed all the other cut lines shown.

Once I was happy with my trace lines or cut lines, I went to the cut settings icon within my silhouette program, I selected copy paper because I was using just regular scrapbook paper, made sure my blade settings matched the recommended settings within the program, and then loaded my Pixscan mat with the paper still on it, and clicked “Send to Silhouette” button.

And just like that… my cameo read the registration marks and cut my flowers out beautifully. I was very impressed with how simple and easy it was to use.
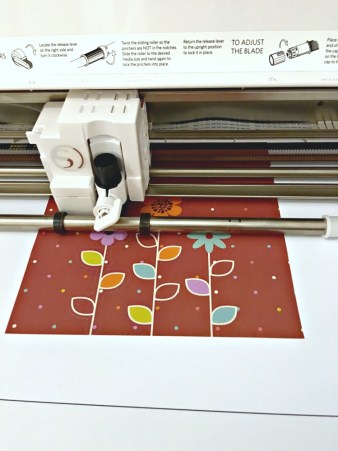
Once I removed the excess paper – only my pretty cutout flowers remained on the mat.

Afterward, I had a light bulb moment when I realized how much easier my print and cut projects will be using this mat. If you own a Silhouette, and you down have one of these mats, don’t walk but RUN and go get one of these mats immediately.

Do you own a silhouette or use the Pixscan mat? If so leave a comment and tell what projects you have used it for!
Want to Join The Crafty Life Mom Community?
I provide craft projects and DIY tips and tricks for all of your crafting needs each week through the Crafty Life Email Club. Subscribers get access to my entire private craft resource library. I share printables for crafting projects and home decor DIYs. Plus I have several SVG cut files that you can use with your Cricut or Silhouette cutting machine and checklists and more!
Click the Pink Box below to get FREE Access!


Comments & Reviews
I really wanted to read this article on Pix Scan but there were so many ads I couldn’t see the content. I realize this is how you make money but this was really too much.
I have had a pix scan mat for over a year and have never taken it out of the package! Guess it’s time to whip it out and give it a try! Thank you for the step by step tutorial!!
Hi. I have the s. Portrait and I can’t get the software to actually calibrate the pixscan mat.. If you would like to, you could post a “how to” for those who do not have the Bluetooth Silhouette Cameo with the phone app. ( which I gather works well.. Bc my app on my phone worked perfect but even though it works on the app, the app doesn’t work with the silhouette portrait. Thank you for any help.
Sj
Hi SJ,
I actually have a portrait machine as well. I will give it a try and see how it works and let you know. However, Im thinking its a matter of taking the picture of the pic scan like I posted, then opening that picture in your software. No blue tooth needed but that it should recognize where on the mat to cut. You can also pull of the picture to size of the mat and trace the image in the picture to cut it to size.
I had no idea this existed! I need one! Lol. I am trying to save money by printing my own planner stickers and being able to use my Silhouette would be amazing. Thanks for the tutorial.
You’re welcome!! It really is an interesting mat to have!
Do you happen to know if a Portrait Pixscan mat will work in a Cameo? I ordered the wrong one. I think I could at least use it as a regular cutting mat if not as a Pixscan mat.
Miss B, I am not sure it if will. I think you will need to get the cameo one so that the rod grabbers will catch on to both sides of the mat. The portrait one may be too narrow to grab on to the rolling rod.