
DIY TV Mantle Makeover
Ever since we moved into this house, my husband and I have wanted to update and do a TV mantle makeover to our builder grade built-ins. He never liked form the first day, and I was a little nervous about just ripping them out and surrendering to his idea, I won the original battle to leave them as is.
Until now…. 8 years later, he won, and we finally did the makeover.
I will admit that it would’ve been so much easier to do it in the beginning when we were doing the floors and painting, but I just didn’t know exactly how I wanted the new version to be.
In the past, I hadn’t discovered what our style was yet, (modern farmhouse with a mix) and I didn’t even know what colors I wanted, so we stuck with the builder grade tan/beige until I could figure it out.
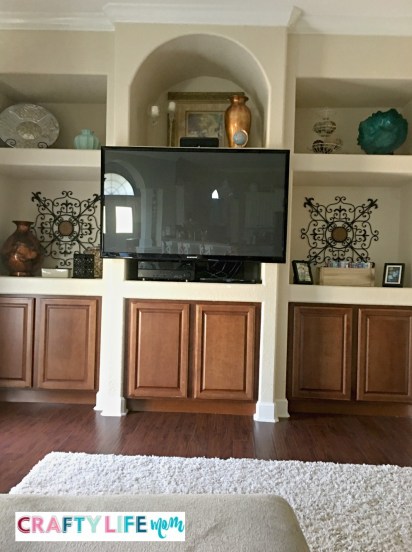
Brown, hardware-less cabinets, beige paint, and molding – boring! Originally when we first moved in out old tv fit inside that box. But it wasn’t until about a year or so later we upgraded it to a larger size. We purchased the larger size tv during a Black Friday sale – which I’ve mentioned how I plan Black Friday in this post.
Hubby then had to create so sort of mount inside the box out of 2X4s and then mount the TV mount to that in order for it to hang just outside the built-ins.
While I never really liked it this way, I dealt with for 5-6 years. It always made me nervous if someone got to close to it, while I was assured it was secure, I just felt one bump into it and it would all come crashing down. Thankfully, that never happened.
And don’t you just love those knick-knacks? I never knew what to put in those large boxes to the right and left. I mean really?? I would’ve had to add shelves to put books there, it collected dust terribly, and it was never aesthetic looking.
Tearing out the old
Once we decided it was time to give this area is much-needed TV mantle makeover, we got to work ripping out the cross walls. This was at least a half day to just get it out to this point pictured below.

We removed the center cabinet because it was actually bumped out about 8 inches from the two cabinets on the left and right. Our goal is to make that cabinet flush with all three cabinets.
The next day we got to work on removing the center walls. We had to remove the wiring back to back wall, which was hard. If you do this, I recommend turning the power off and consult with an electrician for wiring or re-wiring needs. Hubs and I are not electricians but have one in our family who helped us with this part of the process. We also added two new light sconces on one switch so it was necessary to ask anyway.

You can also see above, hubs cut the drywall arch to a much smaller arch. We drywalled the arch up to be flat and no longer an arch. We would’ve ripped this out, but to save time and extra expense on replacing the existing crown molding etc. we left what was up there and blended as a feature in some way.
Once that was complete, we make sure we matched up the floors. We had about 11 boards of flooring that needed to be extended from the original floor since we were moving the center cabinet back. We had exactly 11 pieces leftover from our floors (this was very lucky) in order to make it all fit seamlessly. Otherwise, I am not sure what we would’ve done.

Making the cabinets flush
Once the center cabinet was back in place we took some MDF boards and flushed up the cabinets. We then added some molding pieces to cover the seams of different wood and then a decorative 1/4 inch trim into a square shape in the center.
We painted everything white so it would all flow together. Plus who doesn’t love white?
Adding Shiplap
For the upper portion of the built-ins, we decided to feature the wall with shiplap in the center section. Then on the right and left sides I took two Billy Bookcases from Ikea cut them to size to fit lengthwise. We also added small MDF trim to all of the seams to finish it off. And again painted it white.
I did not paint the entire Ikea bookshelves, only the inner sides that had trim, this was to just minimalize the appearance of two different shades of white and to also cover up any seams or mistakes. We are not carpenters by any means, and even though we measured several times, for some reason, that left bookshelf had to hammer into place damaging the ceiling drywall.

However, with the trim pieces, you cannot tell at all that this was the case. Something tells me that the wall itself is not exact from when the builders built the house.

Adding the Wood Countertop
Next up we cut and measured 3 9-foot long 2X6 boards and 1 2X4 which we used along the back wall. This filled the amount of “countertop” space we needed. Once they were in place, I stained them using a nice dark stain. I love it because it works well with all the white.

Once this was complete, it was pretty much letting it dry overnight, and then styling the bookcases, and adding bins and items that were functional or even seasonal decor in nature. I know in the future I will be adding things in and out with the seasons. For the most part, the shelves hold our kids’ favorite DVDs, and I took our wedding album out and displayed as well. Much better than lying in a box in a trunk somewhere.
I believe a home should be a collection of things you love that tell the story of those who live there, and I think this new TV mantle does exactly that.

And here is the other side of the new built-ins complete.

I haven’t quite figured out hiding all of the cords, behind the DVD and surround system, but it fits pretty snug in there. We also have a charging station that you can’t see (on purpose) to charge all of the ipads. Beforehand it was hard to find a place in our home and a place to keep them.
Here is the middle section with a small piece of greenery I plan to keep out all year long for the most part. I just love the pop of color and farmhouse vibe it provides. Although, I cannot wait to decorate this new TV mantle for Christmas.

And here it is finished! The room feels so much bigger, even though the actual cabinets moved back only about 7 inches. The wall itself was nearly 2 feet. It just brings so much more character to the home, and it feels more open.

What do you think? Do you have a project like this you want to complete?


Leave A Reply!